
Eines vorneweg: Auch wenn ich gern an allem möglichen herumbastle, bei Elektronik hört bei mir der Spaß schnell auf. Ich tausche schon mal defekte Kondensatoren in Netzteilen oder mache aus zwei defekten Kaffeemaschinen eine funktionierende, aber da müssen die defekten Stellen schon durch Rauch oder Feuer auf sich aufmerksam machen. Das große Verständnis von Elektronik fehlt mir. Etwas neidisch beobachtete ich bisher die Bastlerszene, die mit diversen günstigen Bauelementen allen möglichen Kram zusammenzaubert. Und immer wieder hörte ich, dass das alles mittlerweile gar nicht mehr schwer sei. Jeder könne das. Dabei viel immer wieder das Stichwort Arduino.
Im Sommer dachte ich, es wird auch für mich Zeit, mich da mal ein bisschen einzuarbeiten. Also habe ich einen bunten Strauß an Arduinoboards, Sensoren und Aktoren bestellt und zu basteln angefangen: Einfach mal ganz simpel einen Schalter an ein Arduinoboard und damit ein Schrittmotor steuern. Oder mit einem Näherungssensor ein Servo. Oder einfach nur eine LED blinken lassen (ein Unterfangen, an dem ich mit einer analogen Schaltung schnell scheitern würde). Mein Fazit ist: Wer googlen kann, der kann auch Arduino.
Bei diesen Spielereien habe ich irgendwann gelesen, dass diverse Arduinoboards, die ja einfach über die USB-Schnittstelle programmiert werden können, am Rechner auch gleichzeitig als Human Interface Device agieren können, sich also wie eine Maus oder eine Tastatur verhalten. Es ist also relativ leicht, sie als externes Eingabegerät für den Rechner zu verwenden. Dazu sind auch keine speziellen Treiber am Rechner nötig. Board an den USB-Anschluss und fertig.
Die Idee
Damit war die Idee geboren: Beim Bass-Üben stört es mich immer wieder, das Instrument aus der Hand legen zu müssen, um in Spotify nochmal zum Songanfang zu springen, in Youtube-Tutorials vor- oder zurückzuspulen, eine Webseite mit Chords weiterzuscrollen oder einfach nur die Lautstärke des PCs anzupassen. Ich übe in der Regel mit Kopfhörer an einem kleinen Mischpult, an dem auch der Rechner hängt, der mich mit Musik und Tutorials versorgt. Was es braucht ist eine Möglichkeit, diverse Funktionen des Rechners mit den Füßen zu steuern. Sollte mit einem kleinen Arduino machbar sein.
Der Prototyp
Ein Prototyp war schnell aufgebaut:

Aufbau des Prototyps.Die Grafik wurde mit Fritzing erstellt und kann hier heruntergeladen werden.
Neben einem Breadboard, ein paar steckbaren Käbelchen und einfachen Tastern habe ich einen Arduino Pro Micro und ein einfaches LCD-Display (Nokia 5110) verwendet. Wenn man etwas Zeit hat und die Sachen aus „Tschaina“ bestellt kostet das zusammen keine 10€.
Programmierung
Ich hätte jetzt fast geschrieben, die Programmierung war Quick&Dirty. Dirty ist richtig, quick war es nicht wirklich. An sich ist die Programmierung des Arduino simple: Man läd sich die kostenlose IDE, steckt das Board per USB an den Rechner und fängt mit dem Coden an (C++). Es gibt tausend gute ein einfache Tutorials, aber der Teufel steckt wie so oft im Detail. Z.B. war mir bis dahin komplett unbekannt, dass man Schalter und Taster „debouncen“ muss, weil sie sonst bei einem einzigen Schaltvorgang digital gesehen mehrere Schaltvorgänge auslösen, was dann softwareseitig abgefangen werden muss. Ich packe hier mal meinen Code rein, der aber immer noch Work in Progress ist. So verwende ich das Board aber aktuell:
/*

  See HID Project documentation for more Consumer keys:
  https://github.com/NicoHood/HID/wiki/Consumer-API


  Logos erstellt:

  - Logos gesucht
  - In Corel:
    - 20% breiter gemacht
    - konvertiert in schwarz-weiß
    - auf 40px Höhe skaliert
    - auf 80px Breite erweitert
    - als BMP gespeichert
  - Unter http://javl.github.io/image2cpp/ eingelesen und Code für die Bilder erstellt


  Bisher keine Libraries verwendet, die Doppelklick und solche Sachen bei Buttons können.
  Wäre aber sicher hilfreich, leider erst danach gesucht, als ich mein Zeug schon fertig hatte.
  Das hier wären Kandidaten:

  http://jmsarduino.blogspot.de/2009/10/4-way-button-click-double-click-hold.html
  http://www.mathertel.de/Arduino/OneButtonLibrary.aspx
  http://www.instructables.com/id/Arduino-Dual-Function-Button-Long-PressShort-Press/?ALLSTEPS
  http://forum.arduino.cc/index.php?topic=14479.0


*/


// Including the special multimedia keys (see https://github.com/NicoHood/HID):
#include "HID-Project.h"

// Debouncing the buttons:
//
//  Library: http://playground.arduino.cc/Code/Bounce
//  Example: https://github.com/thomasfredericks/Bounce2/blob/master/examples/bounce2buttons/bounce2buttons.ino
//
//  Andere (und schlichtere) Lösung: https://www.youtube.com/watch?v=jYOYgU2vlSE
#include "Bounce2.h"

// Libraries for the Nokia 5110 display:
#include <SPI.h>
#include <Adafruit_GFX.h>
#include <Adafruit_PCD8544.h>


// Software SPI (slower updates, more flexible pin options):
#define PIN_CLK  6  // Serial clock out (SCLK)
#define PIN_DIN  5  // Serial data out (DIN)
#define PIN_DC   4  // Data/Command select (D/C)
#define PIN_CS   3  // LCD chip select (CS)
#define PIN_RST  2  // LCD reset (RST)
Adafruit_PCD8544 display = Adafruit_PCD8544(PIN_CLK, PIN_DIN, PIN_DC, PIN_CS, PIN_RST);


// Define the button pins:
#define BUTTON_PIN_1 15    // VOLUME DOWN
#define BUTTON_PIN_2 14    // VOLUME UP
#define BUTTON_PIN_3 20    // BACKWARD
#define BUTTON_PIN_4 19    // PLAY / PAUSE
#define BUTTON_PIN_5 18    // FORWARD


// Instantiate the (De-) Bounce objects:
Bounce debouncer1 = Bounce();
Bounce debouncer2 = Bounce();
Bounce debouncer3 = Bounce();
Bounce debouncer4 = Bounce();
Bounce debouncer5 = Bounce();


int previousButtonState1 = HIGH;
int previousButtonState2 = HIGH;
int previousButtonState3 = HIGH;
int previousButtonState4 = HIGH;
int previousButtonState5 = HIGH;

// Spotify or Youtube or Scroll?
int programm = 1; // 1: spotify // 2: youtube // 3: scroll

// default state of some variables:
int pressedmute = 0;
int programchange = 1;

// press and hold button:
unsigned long millis_first = 0; // how long since the button was first pressed


static const unsigned char PROGMEM logo_spotify [] = {
  0x00, 0x00, 0x00, 0x00, 0x00, 0x00, 0x00, 0x00, 0x00, 0x00, 0x00, 0x00, 0x00, 0x00, 0x03, 0xe0,
  0x00, 0x00, 0x00, 0x00, 0x00, 0x00, 0x00, 0x00, 0x7f, 0xff, 0x00, 0x00, 0x00, 0x00, 0x00, 0x00,
  0x00, 0x03, 0xff, 0xff, 0xe0, 0x00, 0x00, 0x00, 0x00, 0x00, 0x00, 0x0f, 0xff, 0xff, 0xf8, 0x00,
  0x00, 0x00, 0x00, 0x00, 0x00, 0x1f, 0xff, 0xff, 0xfc, 0x00, 0x00, 0x00, 0x00, 0x00, 0x00, 0x7f,
  0xff, 0xff, 0xff, 0x00, 0x00, 0x00, 0x00, 0x00, 0x00, 0xff, 0xff, 0xff, 0xff, 0x80, 0x00, 0x00,
  0x00, 0x00, 0x01, 0xff, 0xff, 0xff, 0xff, 0xc0, 0x00, 0x00, 0x00, 0x00, 0x03, 0xff, 0xff, 0xff,
  0xff, 0xe0, 0x00, 0x00, 0x00, 0x00, 0x03, 0xff, 0xff, 0xff, 0xff, 0xe0, 0x00, 0x00, 0x00, 0x00,
  0x07, 0xfe, 0x00, 0x0f, 0xff, 0xf0, 0x00, 0x00, 0x00, 0x00, 0x0f, 0xc0, 0x00, 0x00, 0x3f, 0xf8,
  0x00, 0x00, 0x00, 0x00, 0x0f, 0xc0, 0x00, 0x00, 0x07, 0xf8, 0x00, 0x00, 0x00, 0x00, 0x1f, 0xc0,
  0x7f, 0xc0, 0x01, 0xf8, 0x00, 0x00, 0x00, 0x00, 0x1f, 0xff, 0xff, 0xff, 0x00, 0xfc, 0x00, 0x00,
  0x00, 0x00, 0x1f, 0xff, 0xff, 0xff, 0xe0, 0xfc, 0x00, 0x00, 0x00, 0x00, 0x1f, 0xff, 0x80, 0x7f,
  0xf9, 0xfc, 0x00, 0x00, 0x00, 0x00, 0x1f, 0xf0, 0x00, 0x01, 0xff, 0xfc, 0x00, 0x00, 0x00, 0x00,
  0x1f, 0xe0, 0x00, 0x00, 0x3f, 0xfc, 0x00, 0x00, 0x00, 0x00, 0x1f, 0xe1, 0xff, 0xe0, 0x0f, 0xfc,
  0x00, 0x00, 0x00, 0x00, 0x1f, 0xff, 0xff, 0xfe, 0x07, 0xfc, 0x00, 0x00, 0x00, 0x00, 0x1f, 0xff,
  0xff, 0xff, 0xc7, 0xfc, 0x00, 0x00, 0x00, 0x00, 0x1f, 0xff, 0x00, 0x3f, 0xff, 0xfc, 0x00, 0x00,
  0x00, 0x00, 0x1f, 0xf0, 0x00, 0x03, 0xff, 0xf8, 0x00, 0x00, 0x00, 0x00, 0x0f, 0xf0, 0x1f, 0x00,
  0x7f, 0xf8, 0x00, 0x00, 0x00, 0x00, 0x0f, 0xff, 0xff, 0xf8, 0x3f, 0xf8, 0x00, 0x00, 0x00, 0x00,
  0x07, 0xff, 0xff, 0xff, 0x3f, 0xf0, 0x00, 0x00, 0x00, 0x00, 0x03, 0xff, 0xff, 0xff, 0xff, 0xe0,
  0x00, 0x00, 0x00, 0x00, 0x03, 0xff, 0xff, 0xff, 0xff, 0xe0, 0x00, 0x00, 0x00, 0x00, 0x01, 0xff,
  0xff, 0xff, 0xff, 0xc0, 0x00, 0x00, 0x00, 0x00, 0x00, 0xff, 0xff, 0xff, 0xff, 0x80, 0x00, 0x00,
  0x00, 0x00, 0x00, 0x7f, 0xff, 0xff, 0xff, 0x00, 0x00, 0x00, 0x00, 0x00, 0x00, 0x3f, 0xff, 0xff,
  0xfc, 0x00, 0x00, 0x00, 0x00, 0x00, 0x00, 0x0f, 0xff, 0xff, 0xf8, 0x00, 0x00, 0x00, 0x00, 0x00,
  0x00, 0x03, 0xff, 0xff, 0xe0, 0x00, 0x00, 0x00, 0x00, 0x00, 0x00, 0x00, 0x7f, 0xff, 0x00, 0x00,
  0x00, 0x00, 0x00, 0x00, 0x00, 0x00, 0x07, 0xf0, 0x00, 0x00, 0x00, 0x00, 0x00, 0x00, 0x00, 0x00,
  0x00, 0x00, 0x00, 0x00, 0x00, 0x00, 0x00, 0x00, 0x00, 0x00, 0x00, 0x00, 0x00, 0x00, 0x00, 0x00,
};
static const unsigned char PROGMEM logo_youtube [] = {
  0x00, 0x03, 0xff, 0xff, 0xff, 0xff, 0xff, 0xff, 0xe0, 0x00, 0x00, 0x1f, 0xff, 0xff, 0xff, 0xff,
  0xff, 0xff, 0xfc, 0x00, 0x00, 0x3f, 0xff, 0xff, 0xff, 0xff, 0xff, 0xff, 0xfe, 0x00, 0x00, 0x7f,
  0xff, 0xff, 0xff, 0xff, 0xff, 0xff, 0xff, 0x00, 0x00, 0xff, 0xff, 0xff, 0xff, 0xff, 0xff, 0xff,
  0xff, 0x80, 0x00, 0xff, 0xff, 0xff, 0xff, 0xff, 0xff, 0xff, 0xff, 0x80, 0x00, 0xff, 0xff, 0xff,
  0xff, 0xff, 0xff, 0xff, 0xff, 0x80, 0x01, 0xff, 0xff, 0xff, 0xff, 0xff, 0xff, 0xff, 0xff, 0xc0,
  0x01, 0xff, 0xff, 0xff, 0xff, 0xff, 0xff, 0xff, 0xff, 0xc0, 0x01, 0xff, 0xff, 0xff, 0xff, 0xff,
  0xff, 0xff, 0xff, 0xc0, 0x01, 0xff, 0xff, 0xff, 0xff, 0xff, 0xff, 0xff, 0xff, 0xc0, 0x01, 0xff,
  0xff, 0xff, 0xdf, 0xff, 0xff, 0xff, 0xff, 0xc0, 0x01, 0xff, 0xff, 0xff, 0xc7, 0xff, 0xff, 0xff,
  0xff, 0xc0, 0x01, 0xff, 0xff, 0xff, 0xc1, 0xff, 0xff, 0xff, 0xff, 0xc0, 0x01, 0xff, 0xff, 0xff,
  0xc0, 0x3f, 0xff, 0xff, 0xff, 0xc0, 0x01, 0xff, 0xff, 0xff, 0xc0, 0x0f, 0xff, 0xff, 0xff, 0xc0,
  0x01, 0xff, 0xff, 0xff, 0xc0, 0x03, 0xff, 0xff, 0xff, 0xc0, 0x01, 0xff, 0xff, 0xff, 0xc0, 0x00,
  0x7f, 0xff, 0xff, 0xc0, 0x01, 0xff, 0xff, 0xff, 0xc0, 0x00, 0x1f, 0xff, 0xff, 0xc0, 0x01, 0xff,
  0xff, 0xff, 0xc0, 0x00, 0x3f, 0xff, 0xff, 0xc0, 0x01, 0xff, 0xff, 0xff, 0xc0, 0x00, 0xff, 0xff,
  0xff, 0xc0, 0x01, 0xff, 0xff, 0xff, 0xc0, 0x03, 0xff, 0xff, 0xff, 0xc0, 0x01, 0xff, 0xff, 0xff,
  0xc0, 0x0f, 0xff, 0xff, 0xff, 0xc0, 0x01, 0xff, 0xff, 0xff, 0xc0, 0x7f, 0xff, 0xff, 0xff, 0xc0,
  0x01, 0xff, 0xff, 0xff, 0xc1, 0xff, 0xff, 0xff, 0xff, 0xc0, 0x01, 0xff, 0xff, 0xff, 0xc7, 0xff,
  0xff, 0xff, 0xff, 0xc0, 0x01, 0xff, 0xff, 0xff, 0xff, 0xff, 0xff, 0xff, 0xff, 0xc0, 0x01, 0xff,
  0xff, 0xff, 0xff, 0xff, 0xff, 0xff, 0xff, 0xc0, 0x01, 0xff, 0xff, 0xff, 0xff, 0xff, 0xff, 0xff,
  0xff, 0xc0, 0x01, 0xff, 0xff, 0xff, 0xff, 0xff, 0xff, 0xff, 0xff, 0xc0, 0x01, 0xff, 0xff, 0xff,
  0xff, 0xff, 0xff, 0xff, 0xff, 0xc0, 0x01, 0xff, 0xff, 0xff, 0xff, 0xff, 0xff, 0xff, 0xff, 0xc0,
  0x00, 0xff, 0xff, 0xff, 0xff, 0xff, 0xff, 0xff, 0xff, 0x80, 0x00, 0xff, 0xff, 0xff, 0xff, 0xff,
  0xff, 0xff, 0xff, 0x80, 0x00, 0xff, 0xff, 0xff, 0xff, 0xff, 0xff, 0xff, 0xff, 0x80, 0x00, 0x7f,
  0xff, 0xff, 0xff, 0xff, 0xff, 0xff, 0xff, 0x00, 0x00, 0x3f, 0xff, 0xff, 0xff, 0xff, 0xff, 0xff,
  0xfe, 0x00, 0x00, 0x1f, 0xff, 0xff, 0xff, 0xff, 0xff, 0xff, 0xfc, 0x00, 0x00, 0x03, 0xff, 0xff,
  0xff, 0xff, 0xff, 0xff, 0xe0, 0x00, 0x00, 0x00, 0x00, 0x00, 0x00, 0x00, 0x00, 0x00, 0x00, 0x00,
};
static const unsigned char PROGMEM logo_scroll [] = {
  0x00, 0x00, 0x00, 0x00, 0x00, 0x00, 0x00, 0x00, 0x00, 0x00, 0x00, 0x00, 0x00, 0x00, 0x00, 0x00,
  0x00, 0x00, 0x00, 0x00, 0x00, 0x00, 0x00, 0x00, 0x00, 0x00, 0x00, 0x00, 0x00, 0x00, 0x00, 0x00,
  0x00, 0x00, 0x01, 0x80, 0x00, 0x00, 0x00, 0x00, 0x00, 0x00, 0x00, 0x00, 0x03, 0xc0, 0x00, 0x00,
  0x00, 0x00, 0x00, 0x00, 0x00, 0x00, 0x0f, 0xf0, 0x00, 0x00, 0x00, 0x00, 0x00, 0x00, 0x00, 0x00,
  0x1f, 0xf8, 0x00, 0x00, 0x00, 0x00, 0x00, 0x00, 0x00, 0x00, 0x3f, 0xfc, 0x00, 0x00, 0x00, 0x00,
  0x00, 0x00, 0x00, 0x00, 0x7f, 0xfe, 0x00, 0x00, 0x00, 0x00, 0x00, 0x00, 0x00, 0x00, 0xff, 0xff,
  0x00, 0x00, 0x00, 0x00, 0x00, 0x00, 0x00, 0x03, 0xff, 0xff, 0xc0, 0x00, 0x00, 0x00, 0x00, 0x00,
  0x00, 0x07, 0xff, 0xff, 0xe0, 0x00, 0x00, 0x00, 0x00, 0x00, 0x00, 0x0f, 0xff, 0xff, 0xf0, 0x00,
  0x00, 0x00, 0x00, 0x00, 0x00, 0x1f, 0xff, 0xff, 0xf8, 0x00, 0x00, 0x00, 0x00, 0x00, 0x00, 0x3f,
  0xff, 0xff, 0xfc, 0x00, 0x00, 0x00, 0x00, 0x00, 0x00, 0xff, 0xff, 0xff, 0xff, 0x00, 0x00, 0x00,
  0x00, 0x00, 0x01, 0xff, 0xff, 0xff, 0xff, 0x80, 0x00, 0x00, 0x00, 0x00, 0x01, 0xff, 0xff, 0xff,
  0xff, 0x80, 0x00, 0x00, 0x00, 0x00, 0x00, 0xff, 0xff, 0xff, 0xff, 0x00, 0x00, 0x00, 0x00, 0x00,
  0x00, 0x00, 0x00, 0x00, 0x00, 0x00, 0x00, 0x00, 0x00, 0x00, 0x00, 0x00, 0x00, 0x00, 0x00, 0x00,
  0x00, 0x00, 0x00, 0x00, 0x00, 0xff, 0xff, 0xff, 0xff, 0x00, 0x00, 0x00, 0x00, 0x00, 0x01, 0xff,
  0xff, 0xff, 0xff, 0x80, 0x00, 0x00, 0x00, 0x00, 0x01, 0xff, 0xff, 0xff, 0xff, 0x80, 0x00, 0x00,
  0x00, 0x00, 0x00, 0xff, 0xff, 0xff, 0xff, 0x00, 0x00, 0x00, 0x00, 0x00, 0x00, 0x7f, 0xff, 0xff,
  0xfc, 0x00, 0x00, 0x00, 0x00, 0x00, 0x00, 0x1f, 0xff, 0xff, 0xf8, 0x00, 0x00, 0x00, 0x00, 0x00,
  0x00, 0x0f, 0xff, 0xff, 0xf0, 0x00, 0x00, 0x00, 0x00, 0x00, 0x00, 0x07, 0xff, 0xff, 0xe0, 0x00,
  0x00, 0x00, 0x00, 0x00, 0x00, 0x03, 0xff, 0xff, 0xc0, 0x00, 0x00, 0x00, 0x00, 0x00, 0x00, 0x00,
  0xff, 0xff, 0x00, 0x00, 0x00, 0x00, 0x00, 0x00, 0x00, 0x00, 0x7f, 0xfe, 0x00, 0x00, 0x00, 0x00,
  0x00, 0x00, 0x00, 0x00, 0x3f, 0xfc, 0x00, 0x00, 0x00, 0x00, 0x00, 0x00, 0x00, 0x00, 0x1f, 0xf8,
  0x00, 0x00, 0x00, 0x00, 0x00, 0x00, 0x00, 0x00, 0x0f, 0xf0, 0x00, 0x00, 0x00, 0x00, 0x00, 0x00,
  0x00, 0x00, 0x03, 0xc0, 0x00, 0x00, 0x00, 0x00, 0x00, 0x00, 0x00, 0x00, 0x01, 0x80, 0x00, 0x00,
  0x00, 0x00, 0x00, 0x00, 0x00, 0x00, 0x00, 0x00, 0x00, 0x00, 0x00, 0x00, 0x00, 0x00, 0x00, 0x00,
  0x00, 0x00, 0x00, 0x00, 0x00, 0x00, 0x00, 0x00, 0x00, 0x00, 0x00, 0x00, 0x00, 0x00, 0x00, 0x00,
};


void setup() {

  // make the pushButton pin an input:
  pinMode(BUTTON_PIN_1, INPUT);
  pinMode(BUTTON_PIN_2, INPUT);
  pinMode(BUTTON_PIN_3, INPUT);
  pinMode(BUTTON_PIN_4, INPUT);
  pinMode(BUTTON_PIN_5, INPUT);

  // activate internal pull-up:
  digitalWrite(BUTTON_PIN_1, INPUT_PULLUP);
  digitalWrite(BUTTON_PIN_2, INPUT_PULLUP);
  digitalWrite(BUTTON_PIN_3, INPUT_PULLUP);
  digitalWrite(BUTTON_PIN_4, INPUT_PULLUP);
  digitalWrite(BUTTON_PIN_5, INPUT_PULLUP);

  // define display pins as outputs:
  pinMode(PIN_CLK, OUTPUT);
  pinMode(PIN_DIN, OUTPUT);
  pinMode(PIN_DC, OUTPUT);
  pinMode(PIN_CS, OUTPUT);
  pinMode(PIN_RST, OUTPUT);


  // after setting up the button, setup the Bounce instance:
  debouncer1.attach(BUTTON_PIN_1);  debouncer1.interval(50);
  debouncer2.attach(BUTTON_PIN_2);  debouncer2.interval(50);
  debouncer3.attach(BUTTON_PIN_3);  debouncer3.interval(50);
  debouncer4.attach(BUTTON_PIN_4);  debouncer4.interval(50);
  debouncer5.attach(BUTTON_PIN_5);  debouncer5.interval(50);


  // sends a clean report to the host. This is important on any Arduino type:
  Consumer.begin();
  // Sends a clean report to the host. This is important on any Arduino type.
  AbsoluteMouse.begin();


  // initialize display:
  display.begin();

  // optimizing the contrast:
    //  int contrast = 10;
    //  int contrastincr = 5;
    //  while(1) {
    //
    //    display.clearDisplay();
    //    display.setContrast(contrast);
    //
    //    display.setCursor(10,40);
    //    display.setTextColor(BLACK);
    //    display.setTextSize(1);
    //    display.println("Press button");
    //
    //    display.setCursor(20,0);
    //    // display.setTextColor(WHITE, BLACK); // 'inverted' text
    //    display.setTextColor(BLACK);
    //    display.setTextSize(4);
    //    display.println(contrast);
    //    display.display();
    //
    //    // stop contrast incr. when button is pressed:
    //    for(int i=1; i<=10; i++) {
    //      // Update the Bounce instances :
    //      debouncer1.update();
    //      debouncer2.update();
    //      debouncer3.update();
    //      debouncer4.update();
    //      debouncer5.update();
    //
    //      // set contrast and end loop if button is pressed:
    //      if (debouncer1.read() == LOW || debouncer2.read() == LOW || debouncer3.read() == LOW || debouncer4.read() == LOW || debouncer5.read() == LOW) {
    //        goto end_contrast_opt;
    //        }
    //      delay(100);
    //    }
    //    contrast += contrastincr;
    //    if((contrastincr > 0 && contrast == 80) || (contrastincr < 0 && contrast == 20)) {contrastincr = -contrastincr;}
    //  }
    //  end_contrast_opt:


  // if you know the perfect contrast already:
  int contrast = 55;
  display.clearDisplay();
  display.setContrast(contrast);


  // set the correct logo at the start:
  if (programm == 1) {
    display.clearDisplay();
    display.drawBitmap(0, 0,  logo_spotify, 80, 40, 1);
    display.display();
  }
  else if (programm == 2) {
    display.clearDisplay();
    display.drawBitmap(0, 0,  logo_youtube, 80, 40, 1);
    display.display();
  }
  else if (programm == 3) {
    display.clearDisplay();
    display.drawBitmap(0, 0,  logo_scroll, 80, 40, 1);
    display.display();
  }

}


void loop() {

  // update the Bounce instances :
  debouncer1.update();
  debouncer2.update();
  debouncer3.update();
  debouncer4.update();
  debouncer5.update();

  // read the pushbuttons:
  int buttonState1 = debouncer1.read();
  int buttonState2 = debouncer2.read();
  int buttonState3 = debouncer3.read();
  int buttonState4 = debouncer4.read();
  int buttonState5 = debouncer5.read();
  //   without debouncing:
  //   int buttonState1 = digitalRead(BUTTON_PIN_1);


  // VOLUME BUTTONS:

  // VOLUME DOWN:
  if (pressedmute == 0) {
    if (buttonState1 == LOW) {
      if ((buttonState2 != previousButtonState2) && (buttonState2 == LOW)) {
        Consumer.write(MEDIA_VOLUME_MUTE);
        pressedmute = 1;
        delay(500);
      }
      else if (buttonState2 == HIGH) {
        Consumer.write(MEDIA_VOLUME_DOWN);
        delay(250); // sonst läuft es zu schnell...
      }
    }
  }

  // VOLUME UP:
  if (pressedmute == 0) {
    if (buttonState2 == LOW) {
      if ((buttonState1 != previousButtonState1) && (buttonState1 == LOW)) {
        Consumer.write(MEDIA_VOLUME_MUTE);
        pressedmute = 1;
        delay(500);
      }
      else if (buttonState1 == HIGH) {
        Consumer.write(MEDIA_VOLUME_UP);
        delay(150); // sonst läuft es zu schnell...
      }
    }
  }

  if ((buttonState1 == HIGH) && (buttonState2 == HIGH)) {
    pressedmute = 0;
  }


  // PROGRAM BUTTONS:

  // SPOTIFY:
  if (programm == 1) {
    // PLAY / PAUSE:
    if ((buttonState4 != previousButtonState4) && (buttonState4 == LOW)) {      // ACHTUNG: LOW schaltet beim Runterdrücken, HIGH würde erst beinm Loslassen schalten
      // measure the time the button is pressed:
      millis_first = millis();
    }
    else if ((buttonState4 != previousButtonState4) && (buttonState4 == HIGH)) {
      if ((millis() - millis_first) < 1500) {
        if (programchange == 1) {
          programchange = 0;
        }
        else {
          Consumer.write(MEDIA_PLAY_PAUSE);
        }

      }
    }
    // check how long the button is pressed:
    else if (buttonState4 == LOW) {
      if ((millis() - millis_first) > 1500) {
        // switch to youtube:
        programm = 2;
        //change the logo:
        display.clearDisplay();
        display.drawBitmap(0, 0,  logo_youtube, 80, 40, 1);
        display.display();
        // reset the clock:
        millis_first = millis();
        programchange = 1;
      }
    }
    // LAST TRACK:
    if ((buttonState3 != previousButtonState3) && (buttonState3 == LOW)) {
      Consumer.write(MEDIA_PREVIOUS);
    }
    // NEXT TRACK:
    if ((buttonState5 != previousButtonState5) && (buttonState5 == LOW)) {
      //Consumer.write(MEDIA_NEXT);
      AbsoluteMouse.click(MOUSE_LEFT);  // Sending left mouse click to jump to a specific position in a song
    }
  }


  // YOUTUBE:
  else if (programm == 2) {
    // PLAY / PAUSE:
    if ((buttonState4 != previousButtonState4) && (buttonState4 == LOW)) {
      // measure the time the button is pressed:
      millis_first = millis();
    }
    else if ((buttonState4 != previousButtonState4) && (buttonState4 == HIGH)) {
      if ((millis() - millis_first) < 1500) {
        if (programchange == 1) {
          programchange = 0;
        }
        else {
          // Keyboard.print("k");
          // Ein "k" zu senden ist auf Youtube zwar der sicherere Weg, allerdings ist " " flexibler (auch Vimeo, Songsterr, VLC, ...)
          Keyboard.print(" ");
        }
      }
    }
    // check how long the button is pressed:
    else if (buttonState4 == LOW) {
      if ((millis() - millis_first) > 1500) {
        // switch to scroll:
        programm = 3;
        //change the logo:
        display.clearDisplay();
        display.drawBitmap(0, 0,  logo_scroll, 80, 40, 1);
        display.display();
        // reset the clock:
        millis_first = millis();
        programchange = 1;
      }
    }
    // FAST  BACKWARD:
    if (buttonState3 == LOW) {
      //Keyboard.print("j");  // 10 seconds
      Keyboard.press(KEY_LEFT_ARROW); // 5 seconds
    }
    if ((buttonState3 != previousButtonState3) && (buttonState3 == HIGH)) {
      Keyboard.release(KEY_LEFT_ARROW);
    }
    // FAST FORWARD:
    if (buttonState5 == LOW) {
      //Keyboard.print("l");  // 10 seconds
      Keyboard.press(KEY_RIGHT_ARROW); // 5 seconds
    }
    if ((buttonState5 != previousButtonState5) && (buttonState5 == HIGH)) {
      Keyboard.release(KEY_RIGHT_ARROW);
    }
  }


  // SCROLL:
  else  if (programm == 3) {
    // PLAY / PAUSE:
    if ((buttonState4 != previousButtonState4) && (buttonState4 == LOW)) {
      // measure the time the button is pressed:
      millis_first = millis();
    }
    else if ((buttonState4 != previousButtonState4) && (buttonState4 == HIGH)) {
      if ((millis() - millis_first) < 1500) {
        if (programchange == 1) {
          programchange = 0;
        }
        else {
          Consumer.write(MEDIA_PLAY_PAUSE);
        }
      }
    }
    // check how long the button is pressed:
    else if (buttonState4 == LOW) {
      if ((millis() - millis_first) > 1500) {
        // switch to spotify:
        programm = 1;
        //change the logo:
        display.clearDisplay();
        display.drawBitmap(0, 0,  logo_spotify, 80, 40, 1);
        display.display();
        // reset the clock:
        millis_first = millis();
        programchange = 1;
      }
    }
    // SCROLL DOWN:
    if (buttonState5 == LOW) {
      Keyboard.press(KEY_DOWN_ARROW);
    }
    if ((buttonState5 != previousButtonState5) && (buttonState5 == HIGH)) {
      Keyboard.release(KEY_DOWN_ARROW);
    }
    // SCROLL UP:
    if (buttonState3 == LOW) {
      Keyboard.press(KEY_UP_ARROW);
    }
    if ((buttonState3 != previousButtonState3) && (buttonState3 == HIGH)) {
      Keyboard.release(KEY_UP_ARROW);
    }
  }


  // Save the current button state for comparison next time:
  previousButtonState1 = buttonState1;
  previousButtonState2 = buttonState2;
  previousButtonState3 = buttonState3;
  previousButtonState4 = buttonState4;
  previousButtonState5 = buttonState5;
}
Der Code kann hier auch heruntergeladen werden. Auf Einzelheiten will ich hier gar nicht eingehen, wer sich für das Projekt interessiert kann sich anhand meiner großartigen Code-Kommentare sicher gut durchwühlen…
Umsetzung
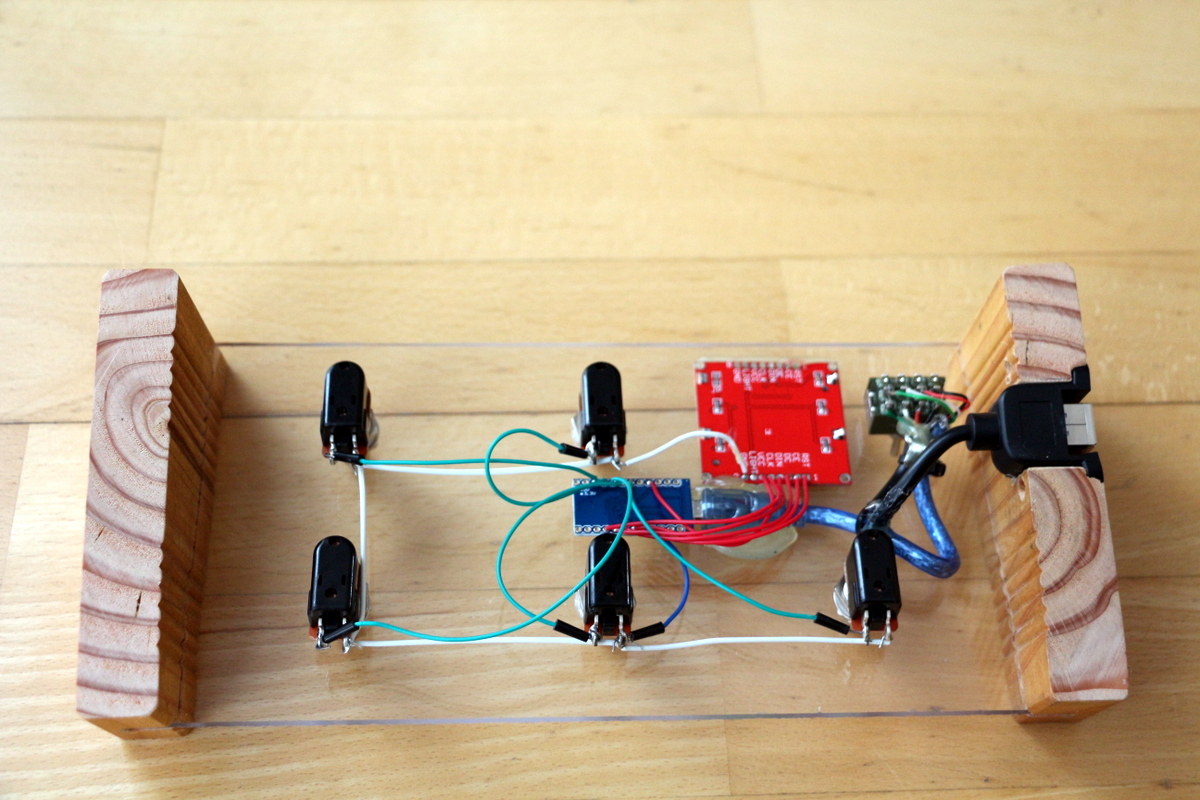
Es ist wie immer: Hat man einen Prototypen wähnt man sich fast am Ziel, aber in Wirklichkeit wird es jetzt erst richtig zäh. Bis hierher motiviert einen der Spieltrieb Forscherdrang, jetzt folgt die Arbeit. Wie soll das Teil aussehen, aus welchem Material soll es gebaut werden, wie groß soll es sein etc. Dann Zeug besorgen, ab an die Säge und an die Lötstation. Und ich muss zugeben, so richtig gefällt mir mein Produkt auch nicht. Aber es funktioniert und ist fertig umgesetzt, immerhin. Hier mal ein paar Bilder:
-

- Vorderseite
-
- Rückseite
-
- Arduino Pro Micro

-
- Modus „Spotify“

-
- Modus „Youtube“

-
- Modus „Scroll“

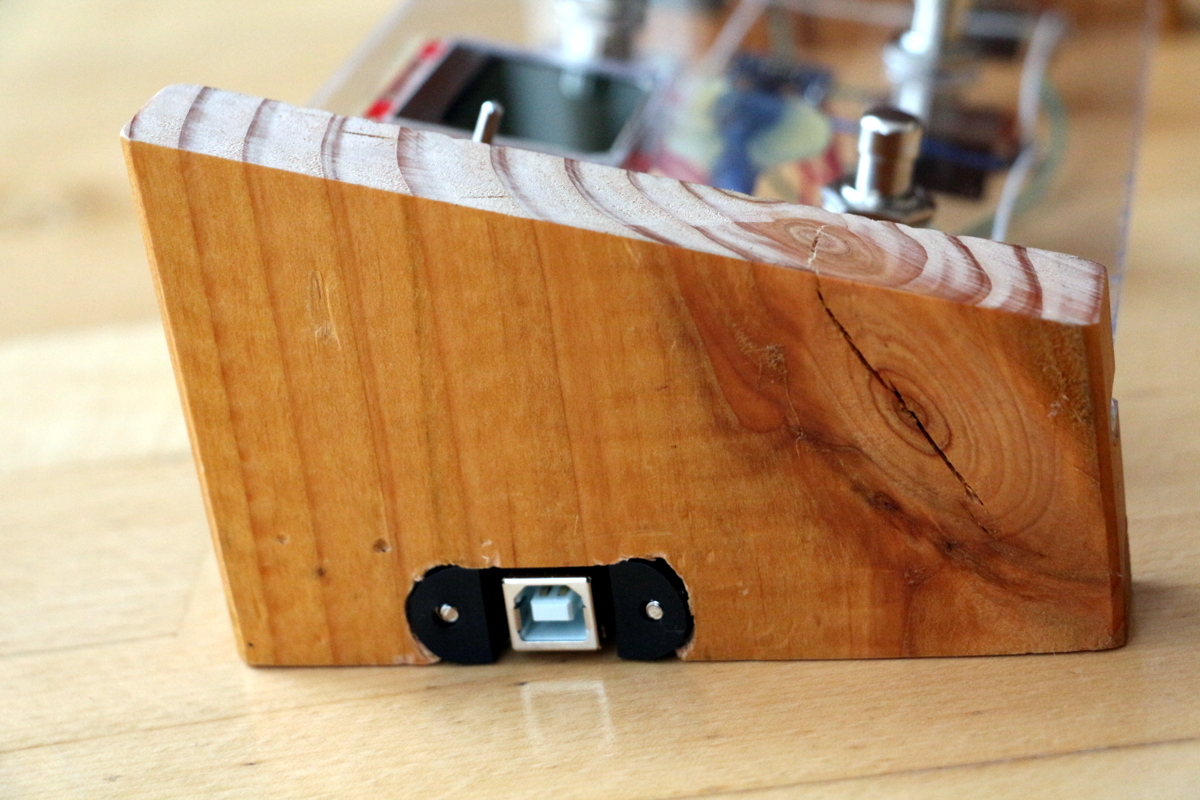
-
- USB-Anschluss
In der finalen Umsetzung gibt es ein paar Unterschiede im Vergleich zum Prototypen:
- Trivial: Statt Steckverbindungen wurde jetzt alles verlötet.
- Die Taster wurden durch ordentliche Fußtaster ersetzt. Sind übrigens die teuersten Teile des Projekts, da kostet das Stück ca. 4€, wenn ich mich recht erinnere.
- Es gibt einen Hauptschalter. Das richtige Schalten eines USB-Anschlusses ist wohl auch nicht trivial, daher schalte ich jetzt einfach alle 4 PINS komplett weg.
Funktionsweise
Ich habe immer noch nicht geschrieben, was das Teil jetzt eigentlich im Detail tut. Im Wesentlichen hat man drei Betriebsmodi. Das Display zeigt den aktuellen Modus an (sieht man auch oben bei den Fotos). Außerdem gibt es oben neben dem Display zwei Taster für lauter und leiser. Drückt man beide gleichzeitig wird der Rechner gemutet.
Die unteren drei Taster sind vom Betriebsmodus abhängig. Zwischen den drei Modi kann einfach mit einem langen Druck auf den mittleren Taster umgeschaltet werden.
Modus 1: Spotify
Ich übe viel mit Spotify. Alternativ funktioniert der Code auch für jeden anderen Mediaplayer. Der mittlere Taster macht hier einfach ein Play/Pause. Braucht man immer. Schön wäre es noch, man hätte jetzt Schalter, um im Song vor- und zurückzuspulen. Dazu gibt es leider keine standardisierten Tastaturbefehle. Daher habe ich auf den linken Fußtaster eine Funktion gelegt, die an den Anfang des aktuellen Songs springt, und auf den rechten Taster einen Mausklick. Ich nutze das so, dass ich die Maus auf die Stelle des Fortschrittsbalkens von Spotify stelle, die ich gerade üben will. Dann kann ich mit dem Fußtaster immer wieder zu dieser Stelle zurückspringen.
Modus 2: Youtube
In Youtube funktioniert das alles etwas besser, finde ich. Hat man ein Youtube-Video im Browser offen kann man mit der mittleren Taste wieder Play/Pause aufrufen und mit der rechten und linken Taste jeweils 5 Sekunden vor oder zurück springen. Extrem praktisch, um einzelne Stellen immer wieder anzuhören und zu üben.
Update: Den Code hab ich hier nochmal etwas angepasst. Ist zwar für Youtube nicht mehr so sicher (man muss das Video direkt aktiv geklickt haben), dafür kann man damit jetzt auch Vimeo, Songsterr, VLC etc. steuern.
Modus 3: Scroll
Diese Modus ist für den Fall, dass man z.B. einen Song in Spotify hört, aber im Browser dazu Chords oder Tabs liest, um dazu zu spielen. In der Regel muss man hier irgendwann im Browser zu scrollen anfangen. Es gibt zwar Webseiten, die ein Autoscroll bieten, so richtig gut funktioniert das in der Regel aber nicht.
Daher kann man in diesem Modus mit der rechten und linken Taste einfach scrollen, die mittlere macht im Mediaplayer (z.B. Spotify) wieder Play/Pause.
Fazit
Ich übe jetzt seit einigen Wochen mit dem Teil und bin begeistert. Das lästige Weglegen des Instruments fällt zum großen Teil weg und man kann einfach flüssiger und effektiver üben. Das Board sollte gut nachzubauen sein. Ich habe sogar mal überlegt, ob man so etwas nicht in einer Kleinserie produzieren sollte, weil es wirklich sehr nützlich für Leute ist, die Gitarre oder Bass oder sowas in dem Setting üben, wie ich es mache. Also mit Instrument und Computer. Allerdings bin ich froh, dass das Projekt jetzt abgeschlossen ist, denn es gibt noch viel zu tun an der Arduino-Front (ich zeige hier besser kein Foto meines Schreibtisches…).
Einzig das Design gefällt mir nicht. Habe mir das nett vorgestellt mit dem Plexiglas und dem Holz, allerdings hat mich da dann in der Umsetzung doch etwas die Lust verlassen, um das ordentlich zu machen. Ich wollte es einfach schnell zu Ende bringen.
Ich bin auch offen für weitere Anregungen zu dem Projekt. Falls du also Ideen oder einfach nur Interesse daran hast: Ab in die Kommentare.
Pingback: Arduino-Bastelei: Backup-Festplatte einschalten (lassen) | dasaweb